
You published a 3,000-word post two years ago. It still gets traffic. But readers land on it, scroll a little, and leave. The content is solid. The problem is the experience. Nobody wants to scroll through a wall of text to find the one section they actually need. That’s where jump links come in and adding them to your old posts is one of the fastest, highest-ROI content updates you can make today.
What Are Jump Links?
Jump links, also called anchor links, page links, or content links – are internal hyperlinks that move a reader to a specific section within the same page when clicked.
You’ve seen them at the top of Wikipedia articles. You’ve used them on documentation sites. That clickable table of contents that skips you straight to “Installation”? That’s anchor navigation.
A jump link is made up of two parts:
- The anchor ID: a unique tag placed on the destination heading or element
- The link itself: a standard hyperlink pointing to that anchor ID using a # symbol
Together, they let readers skip directly to the content they care about without scrolling past everything else.
Why Add Them to Old Posts?
Long-form posts are content goldmines but only if people can actually navigate them.
Here’s what happens when a post has no anchor navigation:
- Readers skim, don’t find what they need fast enough, and bounce
- Mobile users (who make up the majority of your traffic) give up after a few swipes
- Search engines can’t surface specific sections as featured snippets as easily
Adding jump links to your existing long-form content fixes all three of these problems, without rewriting a single word.
The best candidates for this update are posts that:
- Are over 1,500 words
- Have multiple distinct sections or H2 headings
- Already rank on page one or two for a primary keyword
- Have a high bounce rate or low time-on-page in your analytics
A quick scroll through your top-performing old posts will surface several of these immediately.

How Jump Links Work Technically?
Before you start adding page links, it helps to understand what’s happening under the hood.
In HTML, an anchor is created by adding an id attribute to any element, most commonly a heading:
<h2 id=”what-are-jump-links”>What Are Jump Links?</h2>
The jump link that points to it looks like this:
<a href=”#what-are-jump-links”>What Are Jump Links?</a>
The # tells the browser: “don’t load a new page — scroll to the element with this ID on the current page.”
That’s it. Two elements, one smooth scroll.
If you’re using a CMS like WordPress, you often don’t need to touch the HTML at all, many block editors and plugins handle the anchor IDs automatically when you add a heading.
Step-by-Step: Adding Jump Links to Existing Content
Here’s how to retrofit jump links into any long-form post, regardless of your platform.
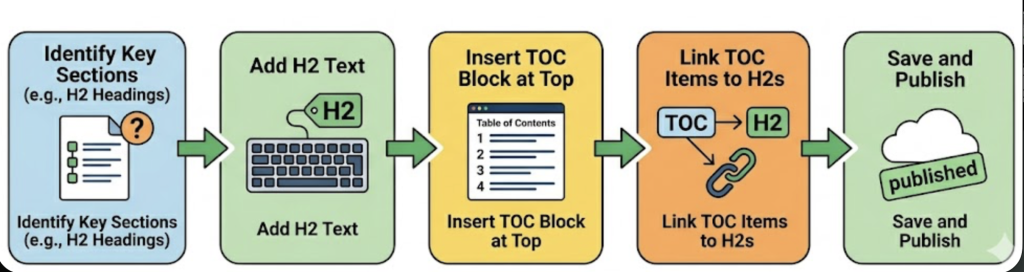
Step 1: Audit Your Headings
Open the post and list every H2 and H3 heading. These are your jump targets. If a post doesn’t have clear headings, add them first – they’re good for SEO and readability regardless.
Step 2: Create Anchor IDs for Each Heading
For each heading, create a short, lowercase, hyphenated ID. Keep it descriptive and unique.
Example:
- “Why You Should Use Jump Links” → #why-use-jump-links
- “Step-by-Step Setup Guide” → #setup-guide
In WordPress (Block Editor), click on any heading block → open the Advanced panel in the sidebar → paste the anchor ID into the HTML anchor field (without the #).
In raw HTML, add id=”your-anchor-id” directly to the heading tag.
Step 3: Build a Table of Contents
At the top of the post- just below the introduction- add a simple list of content links pointing to each section:
<ul>
- <li><a href=”#why-use-jump-links”>Why Use Jump Links?</a></li>
- <li><a href=”#setup-guide”>Step-by-Step Setup Guide</a></li>
- <li><a href=”#best-practices”>Best Practices</a></li>
</ul>
Keep the table of contents minimal. Four to eight items is ideal. You want to help readers navigate, not overwhelm them with a second table of contents that’s longer than the article itself.
Step 4: Add “Back to Top” Links (Optional but Recommended)
At the end of each major section, a short “↑ Back to top” link improves anchor navigation for long posts. It’s a small touch that makes a real difference on mobile.
Step 5: Test Every Link
Click every jump link in preview mode. Verify:
- Each link lands on the correct section
- The page doesn’t snap to the wrong heading
- Anchor IDs are consistent (no typos, no mismatched # symbols)
A few principles separate clean anchor navigation from a frustrating experience:
Keep anchor IDs simple. Short, hyphenated, lowercase. Avoid special characters, numbers at the start, or spaces. Bad: #Section-2-(Updated). Good: #setup-guide.
Match the link text to the heading. If the section heading says “Common Mistakes,” the jump link should say “Common Mistakes” — not “Click here for errors to avoid.” Consistency builds trust and makes content links easier to scan.
Place the TOC after your intro. Don’t open a post with a table of contents. Write a compelling two to four sentence introduction first, then present the page links. Readers need context before a menu makes sense.
Use smooth scrolling. Add scroll-behavior: smooth; to your CSS html selector. It makes the jump feel polished rather than jarring.
html {
scroll-behavior: smooth;
}
Don’t over-link. Not every heading needs to be in the table of contents. Focus on the sections readers are most likely to jump to directly – the meaty, actionable ones.
Common Mistakes to Avoid
Duplicate anchor IDs. If two headings share the same ID, the browser will jump to whichever appears first in the HTML. Always use unique IDs.
Breaking anchor links during edits. If you rename a heading after publishing, update both the anchor ID and the link pointing to it. One edit without the other breaks the chain.
Ignoring mobile. Test every jump link on a phone. Fixed headers on mobile sites can cause the page to land with the heading hidden behind the nav bar. Fix this with a CSS scroll-margin-top offset:
h2, h3 {
scroll-margin-top: 80px; /* Adjust to your header height */
}
Stuffing the TOC. A table of contents with 15 items is not helpful. It’s noise. Curate it.
Do Jump Links Help SEO?
Yes, indirectly, and in a few meaningful ways.
They improve dwell time. When readers can find what they need quickly, they stay longer and engage more. Lower bounce rate and higher time-on-page are signals search engines pay attention to.
They enable sitelinks and featured snippets. Google sometimes pulls individual sections from well-structured pages to display as jump-to links directly in search results. This is more likely when your content uses clear headings and anchor IDs.
They support E-E-A-T. A well-organized post signals professionalism and expertise. Anchor navigation is a small but visible part of that user experience and user experience is part of how Google assesses page quality.
Adding jump links won’t rocket a post from page five to page one overnight. But for posts already close to the top, it can be the small improvement that tips the scales and it definitely keeps the readers you’ve already earned on the page longer.
The Bottom Line
Your old long-form posts already did the hard work of earning traffic. Don’t let poor navigation waste it.
Adding jump links takes less than 30 minutes per post. It improves anchor navigation, reduces friction for your readers, and gives search engines clearer signals about your content structure.
Start with your five highest-traffic posts. Add a table of contents, assign anchor IDs to each heading, test the page links, and publish the update.
That’s it. Small edit. Real results.
Have a long-form post that gets traffic but bleeds readers? Audit your headings today – the fix might be simpler than you think!